How to Build a Retaining Wall
Step-by-step guide to planning and building a retaining wall covering material selection, base preparation, drainage, geogrid reinforcement, and cost.
Quick Summary
- Retaining walls under 4 ft typically do not require engineering; walls over 4 ft need structural engineer approval in most jurisdictions.
- Concrete segmental blocks are the most popular DIY choice - they interlock without mortar and cost $25-$45 per sq ft of wall face installed.
- Drainage is required for all walls over 2 ft: perforated pipe, drainage aggregate, and filter fabric prevent hydrostatic pressure buildup.
- Geogrid reinforcement is needed every 1-2 block courses for walls over 2 ft to anchor the wall against overturning forces.
- The wall face area (length x height) is the standard pricing unit - a 50x3 ft wall = 150 sq ft face.
- Use our Retaining Wall Cost Calculator to estimate materials and costs before starting.
Calculators Used in This Guide
Retaining walls serve two purposes: they hold back soil on sloped properties and create usable flat space for patios, gardens, and lawns. A well-built retaining wall can transform a sloped, unusable yard into a functional outdoor space. This guide covers the key decisions — material selection, drainage requirements, base preparation, and structural reinforcement.
Before starting, understand the critical distinction: walls under 4 ft (typical for residential gardens and terraces) can often be built by experienced DIYers using segmental concrete blocks. Walls over 4 ft require structural engineering, reinforced concrete, or mechanically stabilized earth (MSE) designs and should always be professionally designed and installed. This guide focuses on walls under 4 ft that are suitable for DIY construction with proper planning.
For cost comparison and budgeting, use our Retaining Wall Cost Calculator after you determine the wall dimensions and material. If your project also includes paver patios or walkways, see our Paver Patio Guide for base preparation and paver installation details.
Step-by-Step Guide
Step 1: Assess the Site and Check Codes
Determine the wall height needed and check local building codes. Most jurisdictions require permits for walls over 3-4 ft. Check property lines — if the wall is on or near a boundary, you may need a neighbor agreement. Call 811 for utility locate before any excavation. Also note the slope above the wall — water running off a steep slope creates additional pressure behind the wall that may require extra drainage capacity.
Step 2: Choose Wall Material
Concrete segmental blocks (Versa-Lok, Allen, or similar) are the most popular DIY choice: interlocking, no mortar required, durable for 50+ years. Timber (6x6 treated ties) costs less initially but lasts only 10-15 years and requires deadman anchors or rebar pinning for walls over 2 ft. Natural stone gives the best appearance and lifetime durability but requires dry-stack skill or mortar work and costs the most. Review the material comparison table below to match your budget and skill level.
Step 3: Excavate and Prepare the Base
Excavate a trench 4-6 inches deep and 12-18 inches wide (wider for taller walls). The trench must be level along the entire wall length — use a string line and line level stretched between stakes at each end. Fill with 3/4-inch crushed stone and compact to 95% standard Proctor density using a plate compactor. For walls over 2 ft, excavate additional space behind the wall for drainage aggregate (12-24 inches wide). Use Gravel Calculator to calculate the base gravel and drainage aggregate needed in cubic yards or tons.
Step 4: Install Drainage
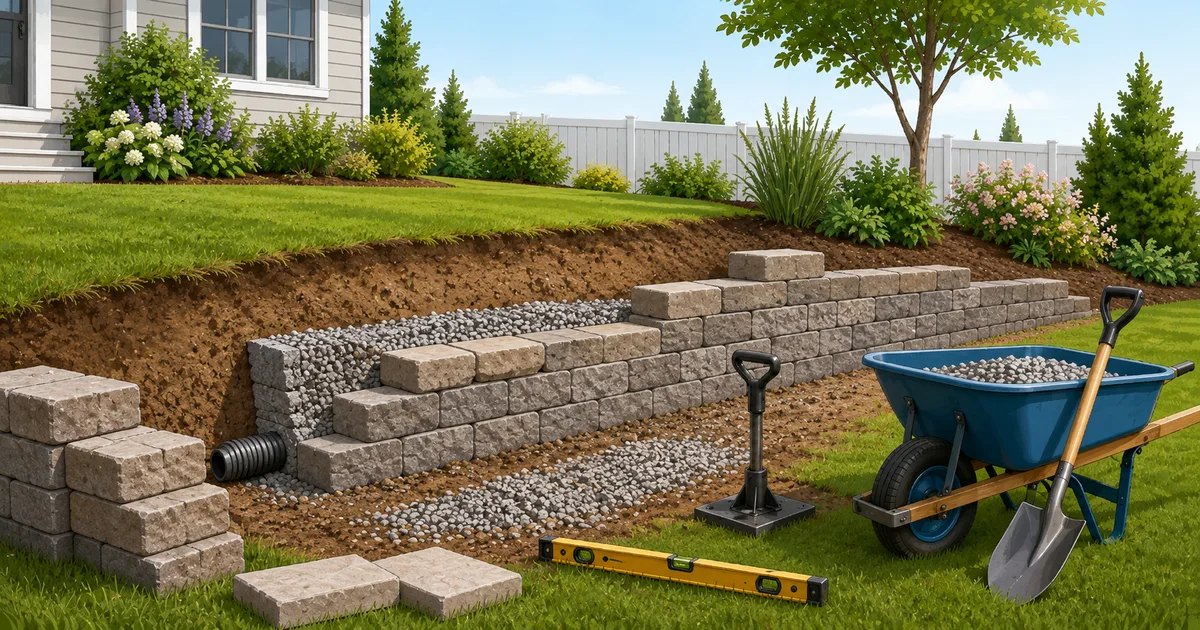
Lay a 4-inch perforated PVC drain pipe at the base of the wall, sloped at 1/8 inch per foot to drain to daylight or a dry well. Wrap the pipe in filter fabric to prevent soil from entering the perforations. Fill the space behind the wall with 3/4-inch washed stone (drainage aggregate). Install a layer of filter fabric between the drainage stone and the backfill soil to keep fine soil particles from migrating into the stone and clogging the drainage system. Drainage is required for all walls over 2 ft — skipping it is the most common cause of retaining wall failure.
If the wall is near a building foundation, a foundation drainage professional should review the plan to ensure water is not redirected toward the structure.
Step 5: Lay the First Course
The first course of blocks is the most critical — it must be perfectly level and compacted into the gravel base. Each block should be fully bedded in the gravel and level side-to-side and front-to-back. Check every block with a 4-ft level. The first course is set below grade so the finished lawn or garden grade meets the base of the first full block course. Take your time on this step — every subsequent course follows the first.
Step 6: Install Geogrid (Walls Over 2 ft)
Geogrid mesh extends horizontally from between block courses back into the soil behind the wall. Its job is to anchor the wall against overturning forces. For a 3 ft wall, geogrid is typically placed after the second block course and every other course above that. The geogrid length behind the wall should be 50-70% of the wall height — a 3 ft wall needs geogrid extending 1.5-2 ft back into the soil. Stretch the geogrid tight and pin it into the compacted backfill soil with landscape staples. Use a geogrid rated for the wall type (segmental block geogrid has a specific tensile strength rating that must be matched to the wall load).
Step 7: Build the Wall
Stack subsequent courses with a slight batter (lean back into the slope) — typically 1 inch per foot of height. Use the block manufacturer pin or clip system to secure each course. Backfill and compact soil behind each course before adding the next. Keep the wall face clean during construction — dripped mortar or mud stains are difficult to remove once dry. For the top 12-18 inches, use topsoil as backfill so plants can grow in it. Use Concrete Block Calculator to estimate total blocks needed after determining wall dimensions.
Step 8: Finish the Top
Install cap blocks on the top course using construction adhesive. The caps protect the wall from water infiltration and provide a finished appearance. Slope the ground surface at the top of the wall away from the wall to direct surface water away rather than into the drainage system. For walls that double as seating, choose large flat cap blocks with a smooth finish.
Worked Examples
3 ft x 30 ft Segmental Block Retaining Wall
A 30 ft long, 3 ft high retaining wall using concrete segmental blocks on a moderate slope with standard drainage and geogrid reinforcement.
- →Wall face area: 30 x 3 = 90 sq ft.
- →Blocks needed (each 6x18 in face = 0.75 sq ft): 90 / 0.75 = 120 blocks. Add 5% waste: order 126 blocks.
- →Base gravel: 30 ft x 1.5 ft x 0.5 ft / 27 = 0.83 cu yd. Order 1 cu yd.
- →Drainage stone behind wall: 30 ft x 1.5 ft x 1.5 ft / 27 = 2.5 cu yd. Order 3 cu yd.
- →4-inch perforated drain pipe: 30 ft with one coupling, end cap, and filter fabric sleeve.
- →Geogrid: 1 layer, 30 ft long x 1.5 ft wide (extends 1.5 ft behind wall).
- →Cap blocks: 30 linear ft / 1.5 ft per cap = 20 cap blocks.
Result: Materials: 126 blocks, 4 cu yd gravel total, 30 ft drain pipe, 45 sq ft geogrid, 20 caps. DIY material cost estimate: $800-$1,400. Professional installed: $3,500-$5,500.
Order blocks from a single manufacturing lot to ensure consistent color. Store blocks on pallets off the ground and covered with a tarp to prevent staining from mud splashes during construction. Rent a plate compactor and have it on site before you start digging.
Reference Table
| Material | Cost per sq ft | Lifespan | DIY Difficulty | Best For |
|---|---|---|---|---|
| Concrete Segmental Block | $25-$45 | 50+ years | Intermediate | Most residential walls under 4 ft |
| Timber (6x6 treated) | $15-$30 | 10-15 years | Beginner | Short garden walls, budget projects |
| Natural Stone | $30-$60 | 50+ years | Advanced | Premium appearance, permanent walls |
| Interlocking Pavers (wall units) | $20-$40 | 25-50 years | Intermediate | Matching paver patio retaining walls |
Reference Table
| Wall Height | Permit Typical Threshold | Geogrid Needed? | Engineer Needed? | Base Trench Width |
|---|---|---|---|---|
| Under 2 ft | No permit | No | No | 12 in |
| 2-3 ft | Often no permit | Yes (every 2 courses) | No | 12-15 in |
| 3-4 ft | Permit often required | Yes (every 1-2 courses) | Typically no | 15-18 in |
| 4-6 ft | Permit required | Yes (each course) | Yes, structural engineer | 18-24 in |
| Over 6 ft | Permit + engineered design | Yes (engineer-specified) | Yes, always required | 24+ in |
Common Mistakes to Avoid
Skipping drainage behind the wall
All walls over 2 ft need perforated pipe, drainage aggregate, and filter fabric. Hydrostatic pressure is the #1 cause of wall failure.
Not compacting backfill in lifts
Compact soil behind the wall in 6-8 inch lifts. Uncompacted backfill settles 2-4 inches in the first year, bending or breaking drain pipes.
Building on uneven or uncompacted base
The base trench must be level and gravel compacted to 95% Proctor density. An uneven base causes blocks to shift and the wall to lean.
Omitting geogrid for walls over 2 ft
Geogrid anchors the wall into the soil behind it. Without geogrid, the wall can overturn under soil pressure during heavy rain.
Building walls over 4 ft without engineering
Walls over 4 ft require structural engineering. Without it, the wall may fail catastrophically, causing property damage and injury risk.
Installing drain pipe without proper slope
The perforated drain pipe must slope at least 1/8 inch per foot toward your drainage outlet. Without proper slope, water pools in the pipe instead of draining, creating hydrostatic pressure behind the wall.
DIY Planning Checklist
- Check local building codes and permit requirements for your wall height.
- Call 811 for utility locate before any excavation.
- Determine wall height, length, and material choice.
- Calculate blocks, base gravel, drainage stone, pipe, and geogrid quantities.
- Verify property lines — get neighbor agreement if wall is near boundary.
- Excavate level trench at correct width and compact gravel base.
- Install perforated drain pipe with filter fabric and 1/8 in/ft slope.
- Lay and level the first block course below final grade.
- Install geogrid at required intervals for walls over 2 ft.
- Stack remaining courses with slight batter (1 in per ft of height).
- Backfill and compact soil behind each course as you go.
- Install cap blocks with construction adhesive.
- Grade the top surface to direct surface water away from the wall.
- Allow 1-2 weeks for settling before planting next to the wall.
When to Contact a Professional
Retaining walls under 3 ft are good DIY projects. Hire a professional for:
- Walls over 3 ft requiring geogrid and complex drainage systems.
- Walls over 4 ft that need structural engineer involvement.
- Walls on steep slopes where access and safety are challenging.
- Properties with poor soil conditions (clay, high water table).
- Walls near structures, driveways, or property lines where failure could cause damage.
Professional retaining wall installation costs $25-$60 per sq ft installed depending on material and complexity. A structural engineer adds $500-$3,000 for design and inspection.
Frequently Asked Questions
Related Calculators
Retaining Wall Cost Calculator
Estimate retaining wall cost by material, height, and length.
Concrete Block Calculator
Find how many CMU blocks needed for walls and foundations.
Gravel Calculator
Calculate cubic yards or tons of gravel for driveways and paths.
Concrete Calculator
Calculate bags or cubic yards of concrete needed for any project.
Square Footage Calculator
Calculate the square footage of any room or space in seconds.
Patio Cost Calculator
Estimate patio installation cost by material and size.
Slope & Grade Calculator
Calculate slope percentage, grade, and angle for drainage and grading.
References and Data Sources
NCMA - National Concrete Masonry Association Segmental Retaining Wall Guide
Industry standard design and installation guide for segmental retaining walls including geogrid placement, base design, drainage requirements, and construction best practices.
ASTM D6916 - Standard Test Method for Retaining Wall Blocks
Material testing standard for concrete segmental retaining wall blocks including compressive strength, dimensional tolerances, and freeze-thaw durability classifications.
All references are used for general estimation guidance only. BuildCalcHub does not claim certification, endorsement, or partnership with any listed organization. Always consult a licensed professional for your specific project requirements.
DIY Guides
Explore more step-by-step guides